Amazon Web Services has a service called Amazon Lightsail that enables customers to launch cloud projects with virtual private servers (VPS) starting at $5 per month. The key advantages about Lightsail are the simplicity in deployment and the very un-complicated pricing (aka like those WordPress hosting companies). You are almost assured of a standard pricing every month (as compared to the possibility of a surprise through the AWS cloud services).
Also it is available in 10 global regions and 30 availability zones. That fulfils my long standing wish to have my WordPress sites hosted locally in a Singapore based data center (as that’s where most of my readers are from).

Over the years, as part of a hobby, I have several web sites that were hosted in various shared hosting companies (Hostgator, Namecheap). Usually we started them with a very good offer and then later have to move them around to take advantages of new offers. Over time this gets very complicated and messy. With each move, there are also the various Domain Name Registrars (GoDaddy, Namecheap, Enom) etc and even the DNS services they provided. The email services for these web sites were also running on the hosting companies. Moving away from any hosting company means losing the emails. It is all very messy and un-scalable.
All in all, this year (2018), I decided to finally consolidate everything to a single provider, Amazon. So I am now using Amazon as a hosting company (Amazon Lightsail, Amazon S3), Amazon as a domain registrar (Amazon Route 53) and Amazon as a DNS provider (Amazon Route 53). For my email provider, I moved to a single provider (MXroute) who can provide email services for multiple domains, regardless of which platform or hosting companies I am using.
Let’s talk about Lightsail. You do need to have a AWS account first but take note that the ‘1 year free offerings’ of AWS does not apply to this Lightsail. You do get first month free but that’s that.
Set up Amazon Lightsail Instance
Upon launching and accessing the page:

You can then choose an instance and the OS and the application you are keen in. For me, that’s WordPress.


In Lightsail you can choose a virtual private server image from a menu of over 10 images. After selecting pre-configured images you can add popular web applications with a single click including WordPress, Magento and more to run your application on the server.
You then select a server size starting from $5 a month model to $80 a month. Lighsail VPS are preconfigured with SSD-based storage, DNS management, and a static IP address which are enough to get your WordPress running.

Choose Your Amazon Lightsail Instance
I choose the $5 per month instance for one of my web sites:

And the instance is born.. with WordPress already installed:
A good resource is this link now.

You can navigate to your new basic WordPress instance using the public IP address that has been assigned to you. That means just enter the IP address given in Amazon light sail in a browser and press enter 🙂
And behold, the welcome screen for your new WordPress site. Yes, it is pre-installed as part of the image. Compare this with the more tedious way of setting it up manually.

Log On to your WordPress Instance
What you will want to do now is to log into the WordPress instance and update the WordPress software or starting creating content (assuming this is your new WordPress site and no migration is needed). So let’s first get to the terminal screen. Amazon Lightsail provides a SSH terminal screen:


Enter this command (unbelievable, I am totally noob to Linux and I have to do this ;P)
cat bitnami_application_password

(You can make use of the clipboard on the right hand side to copy and paste your commands from web pages before copying and pasting it to the SSH command lines to make it much easier)
The system will then provide you with the password. This is the password to the WordPress installation and you will need it to create new users, update software etc.

So you can now log into the WordPress with the IP address given in the console:
To log on, please use the username : user (Yes very innovative)

And you are in the WordPress admin screen. There are 10 updates needed in this case.


Amazon Lightsail comes pre-installed with many plugs in, some of which are pretty useful. But they all need an update 🙂

You might also want to update the OS
sudo apt-get update
sudo apt-get upgrade
sudo apt-get dist-upgrade
sudo apt-get autoremove
sudo reboot
Remove Bitnami Logo
Again, assuming you have no existing WordPress site to migrate, you are ready to start creating your first blog post (Hello World ?). But you noticed that damn logo on the right hand side of the screen 🙂

You can remove that. I don’t think anyone wants to host a WordPress site with that log showing all the time. To do that, go back to the SSH terminal window and enter these two commands. In reality, I found the first one will work just fine.
sudo /opt/bitnami/apps/wordpress/bnconfig –disable_banner 1
sudo /opt/bitnami/ctlscript.sh restart apache

Tata:

Set up your Static IP
Now that’s not all. You will now want to enable a Static IP for your WordPress. The great news is that this is now done easily in Amazon Lightsail (yes, you now have a static IP as compared to the sad days of shared hosting plans and CPanel..).
To do that, go to the networking tab and create Static IP:

You will then assign a static IP to the instance you have created. This is FREE (or part of the $5 you paid) !!


If you now try to go back to your web page, the original IP no longer works as you have to use the static IP now:

Set up your DNS
Now you have a WordPress installation running with a Static IP address. Now its time to tie that IP address to your website name. Depending on where your current domain registrar is, there are a few ways to do so.
Originally, my Domain provider was still Enom. I pointed my domain in Enom to nameservers from Hostgator. For my DNS records they are set up in the hostgator using Cpanel. My email and its settings are all set up in Cpanel.
In other words,
Domain (Enom) -> DNS (Hostgator) -> WordPress (Hostgator Shared Hosting).
I can and will now change all these.
When I set up Lightsail, I still initially kept my Enom domain (till one week later when all things are more stable and it will take a week to migrate from Enom to Amazon Route 53 Domains). But I can now start to use the DNS services from Lightsail. You get DNS service from AWS free with your LightSail account. I will hence need to set the nameservers with my domain provider. To that, I will provide Amazon nameservers (to replace Hostgator nameservers) to my Domain provider. So that my domain provider know how to find my DNS provider which then know how to find my web site.
By using Lightsail DNS, I am using AWS world class infrastructure to do the DNS name resolution for my web site.
To do that, I create a DNS zone in Amazon lightsail (note that this is in Amazon lightsail and NOT in Amazon Route 53.. different hor).


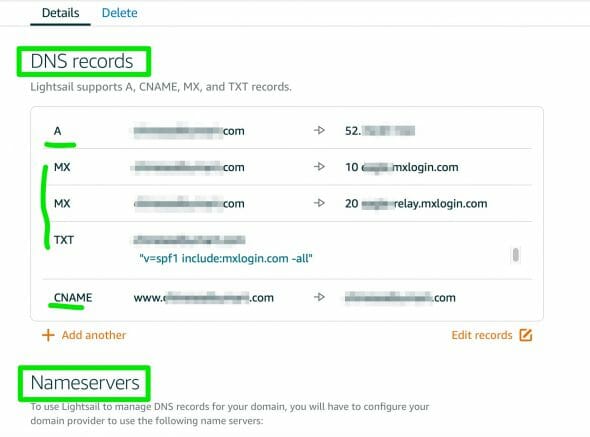
With Amazon lightsail, you can manage the DNS itself. So I use it for my A record, CNAME as well as my MX records (which are provided by my new mail provider).

Change your nameservers when you are ready
You will then get 4 (FOUR) nameservers to be used with your domain provider:

So I go back to my Domain registrar, Enom and changed:

To:

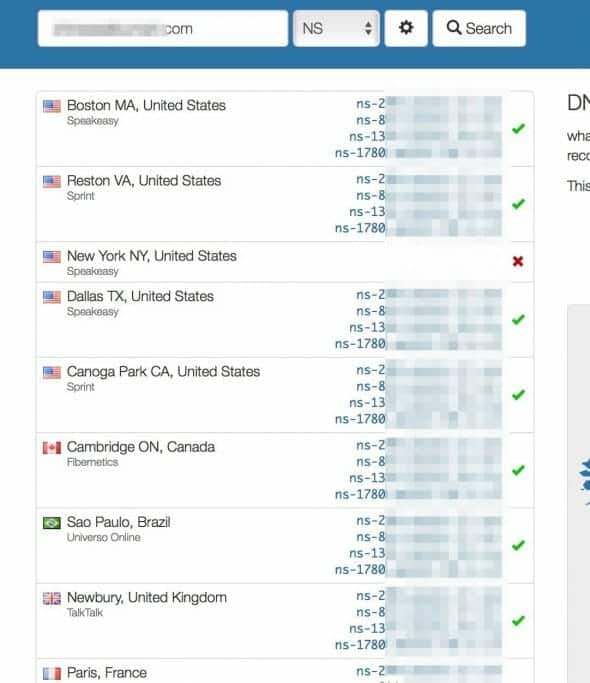
Once you saved, you can use a tool such as this one to check how the Global dns propagation goes.

In reality, you only do this last step when your web site is ready. That means in most cases you have already migrated from an existing web host (such as Hostgator etc) to your web site in Amazon. Once you tested (using the static IP address and everything is working), then you will switch the name servers to the Amazon ones. I have deliberately left out details of the migration from one existing web site to the Amazon Lightsail as such information can be found easily on the internet. I used All-in-one WP migration to do so.
It take a few hours to do this propagation but if you are using ViewQWest in Singapore, it takes 24 hours. If you use Singtel to check on your phone, it takes a few hours.
Move to your Domain to Amazon Route 53 (optional)
This is optional but I wanted to do this as part of my 2018 WordPress consolidation plans. Basically you transfer your existing domain to Amazon (paying a full year of domain fees which will be added to your existing domain period), unlock your domain with your existing domain provider, get an authorisation code from your provider and then wait 1 week for your domain to be transferred to Amazon Route 53. Amazon Route 53 will use your Amazon lightsail nameserers and route traffic to your WordPress.
In other words
Domain Registrar (Amazon Domain in Route 53) -> DNS (Amazon Lightsail) > WordPress VPS Hosting (Amazon Lightsail)
Everything Amazon 🙂


That is the most detailed topic I have ever seen. Hats off. Beautifully explained the topic with infographics giving strength to your words. For the DNS Propagation, as an alternative to whatsmydns.net, for more detailed DNS Propagation lookup results, with more server points available to check the live propagation results instantly, and to use it in a more flexible way, you can use that tool https://dnschecker.org/. The addition of that tool will definitely help the users in getting more detailed propagation results.